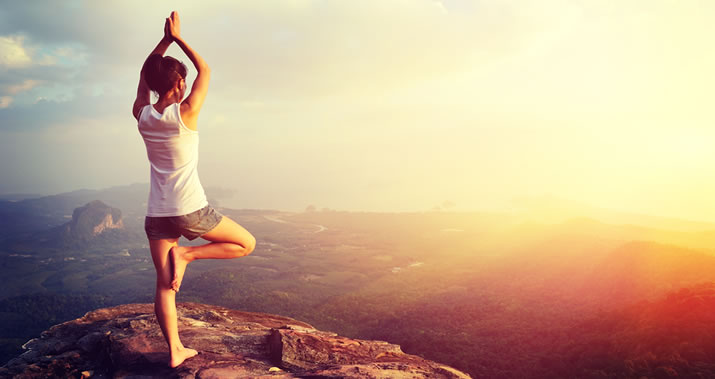
Yoga is known as an excellent way to relieve stress. What many people may not realize is that it is also one of the most effective workouts for fighting stubborn fat stores, especially those that appear after age 40. The reason that yoga is helpful at fighting fat has to do with our hormones. Studies show that yoga lowers levels of stress hormones and increases insulin sensitivity, both of which signal your body to burn food as fuel rather than store it as fat.
By making you more aware of your body, yoga naturally encourages you to view food as fuel for your body, rather than for a sugar fix or pleasure. Using your own body weight as resistance helps you build strong, lean muscles all over, from your arms and core to your back and legs. It also increases your metabolism and burns calories. Whether you are looking to incorporate yoga into your regular work-out routine or start a consistent yoga practice, the following yoga poses for weight loss will increase your ability to fight stubborn fat while firming up your arms, legs, butt, and abdominal muscles.
Standing Asanas
Ardha Chandraasana or Half Moon pose

Benefits: This pose is great to tone your buttocks, upper and inner thighs. The added stretch on the sides of your stomach helps to reduce love handles and strengthen your core.
Steps
- Stand with your feet together.
- Raise your hands above your head and clasp your palms together, extend the stretch by trying to reach for the ceiling.
- Exhale, and slowly bend sideways from your hips, keeping your hands together. Remember not to bend forward and keep your elbows straight. You should feel a stretch from your fingertips to your thighs.
- Inhale and come back to the standing position. Repeat this pose on the other side.
*Avoid this pose if you have digestive disorders, a spine injury or high blood pressure.
Veerbhadrasana 1 or Warrior pose

Benefits: This asana stretches your back, strengthens your thighs, buttocks and stomach and helps you lose weight.
Steps
- Stand with your feet together and hands by your side.
- Now extend your right leg forward and keep your left leg extended backwards.
- Gently bend your right knee so that you get into the lunge position.
- Twist your torso to face your bent right leg.
- Slightly turn your left foot sideways (about 400-600) to give you extra support.
- Exhale, straighten your arms and raise your body up and away from your bent knee.
- Stretch your arms upwards and slowly tilt your torso backwards so your back forms and arch.
- To get out of this pose exhale and straighten your right knee. Now push off your right leg and come back to your original position. You can use your hands to support you. Do not rush out of this pose; you might injure your back or legs.
- Repeat this asana for the other leg as well.
*Avoid this pose if you have high blood pressure, shoulder, knee or back trouble.
Utkatasana or Chair pose
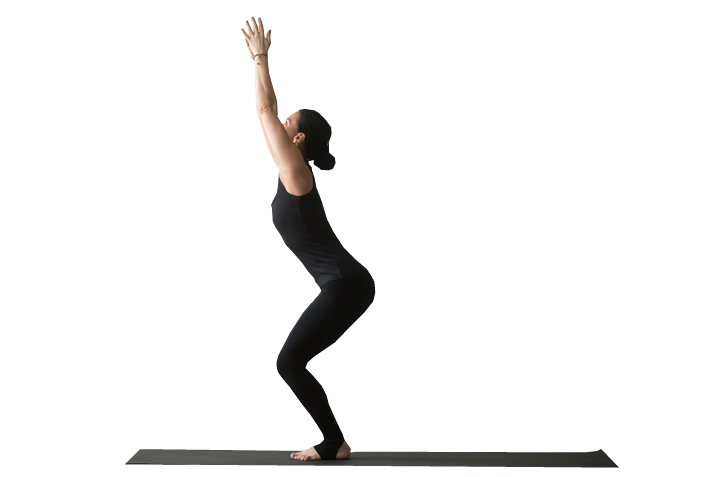
Benefits: It strengthens the core muscles, thighs and tones the buttocks.
Steps
- Stand straight on your yoga mat with your hands in namaste in front of you.
- Now raise your hands above your head and bend at the knee such that your thighs are parallel to the floor.
- Bend your torso slightly forward and breathe.
- Stay in this position for as long as you can. Gently go back to the standing position.
*Avoid this pose if you have a knee or back injury.
Vrksasana or Tree pose
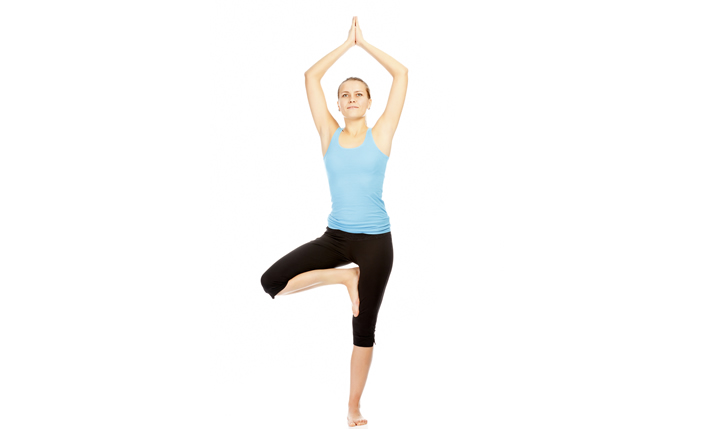
Benefits: This asana is great for the muscles of your abdomen and tones the thighs and arms.
Steps
- Stand with your legs together.
- Put most of your weight on one leg.
- Now raise the leg with the least weight so that your foot is facing inwards, towards your opposite knee.
- You can hold your ankle to help you pull up the leg.
- Place the heel of your foot on your inner thigh of the other leg, as close to the pelvis as possible.
- Now gently raise your hands above your head making sure your fingers are pointing towards the ceiling.
- Make sure you focus your mind and try to maintain your balance.
Breathing steadily and focusing on one spot in front of your eyes helps in maintaining the pose and not falling over. Do not try to hold a chair or wall for support while doing this pose. It will only reduce the intensity of the asana.
*If you have injured your knee or back please do this asana under the supervision of a trained expert.
Willow Pose

Benefits: This asana tones and strengthens abdominal muscles.
Steps
- Stand with feet together, arms at sides.
- Place sole of left foot on inside of right thigh, knee bent to side.
- Touch palms in front of chest for 2 breaths.
- On third inhale, extend arms up, fingertips toward ceiling.
- Exhale, and bend torso to left.
- Inhale and straighten.
- Repeat 3 to 5 times, pressing foot into thigh; switch sides.
- Make it easier: Keep left foot on calf or touch toes to floor for balance.
- Make it harder: Close eyes as you balance and bend.
Sitting Asanas
Ardha Matsyendrasana or Half Spinal Twist

Benefits: This asana increases the capacity of your lungs so it can inhale and hold more oxygen. It stretches the spine and tones the thighs and abdominal muscles. It stimulates the digestive system helping you digest food more efficiently and lose weight.
Steps
- Sit up with your legs stretched out straight in front of you, keeping your feet together and your spine erect.
- Bend your left leg and place the heel of your left foot beside your right hip (optionally, you can keep your left leg straight).
- Now, take the right leg over your left knee and place your left hand on your right knee and your right hand behind you.
- Twist at the waist, shoulders and neck in this sequence to the right and look over the right shoulder.
- Hold and continue with gentle long breaths in and out.
- To come back to the starting position, continue breathing out, release the right hand first (the hand behind you), release the waist, then chest, lastly the neck and sit up relaxed yet straight. Repeat on the other side.
*If you have a back injury, only do this pose in the presence of a certified trainer.
Badhakonasana or Cobbler pose
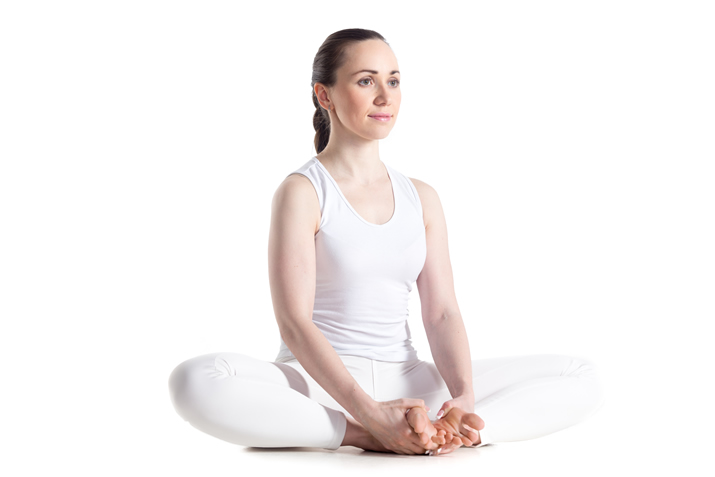
Benefits: This asana reduces fat on your inner thighs and strengthens your spine, muscles of the groin, knees and lower back. It also helps relieve menstrual discomfort and improves digestion.
Steps
- Sit on your yoga mat with your legs stretched out in front of you.
- Keep your spine erect and bend your legs at the knees, such that the soles of your feet are facing each other.
- Now with your hands pull your legs in so that your heels touch each other and they are as close to your pelvis as possible.
- While holding your legs at the ankles, move your thighs up and down, just like the wings of a butterfly. Do this as many times as you can.
Remember that the closer your legs are to your pelvis the greater the benefit of this pose. Do not push yourself. Do as much as you can and your flexibility will improve with time.
*Do not do this asana if you have injured your knees.
Rocking Boat
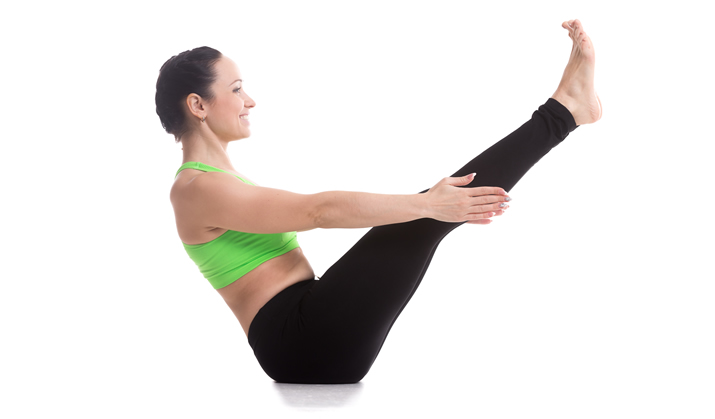
Benefits: This asana firms your abdominal and buttocks muscles.
Steps
- Sit with knees bent, feet on floor, hands on thighs.
- With torso straight and head in line with body, lean back about 45 degrees, raising feet so calves are parallel to floor, toes pointed.
- On an inhale, extend arms and legs, keeping legs together.
- Exhale, and as you inhale, lower torso and legs 3 to 4 inches so body forms a wider V shape.
- Exhale and raise torso and leg
- Repeat 3 to 5 times
- Make it easier: Hold backs of thighs with hands and keep legs bent. Lower torso only.
- Make it harder: Once in the wider V position, extend arms overhead.
Lying Asanas
Halasana or Plough pose

Benefits: This pose is great for those who sit for long hours and tend to have bad posture. It tones the muscles of your buttock and strengthens your shoulders and thighs. It also stimulates the functioning of the thyroid glands, parathyroid glands, lungs and abdominal organs, therefore helping the blood rush to your head and face. It has been known to improve digestion and keep hormonal levels stable.
Steps
- Lie flat on the floor on your back with your feet flat on the floor.
- Place your arms by your side and bend your knees so that your feet are flat on the floor.
- Now, slowly raise your legs from the hips.
- Place your hands on your hips as you raise it and use them as support.
- Now slowly bend your legs at the hips and try to touch the floor behind your head with your toes and straighten your hands so they are flat on the floor.
- Breathe out while going up.
- To return to the lying position, gently roll your back onto the floor, breathing in while you come down. Do not drop down suddenly.
*If you suffer from liver or spleen disorders, hypertension, or have suffered a neck injury, avoid doing this pose.
Hover pose

Benefits: Firms shoulders, arms, abdominal and back muscles.
Steps
- Begin in push-up position on toes with arms straight, hands below shoulders, and body in line from head to heels.
- On an exhale, lower chest toward floor, bending elbows back, arms close to body, abs tight. Hold a few inches above floor.
- Make it easier: Begin on hands and knees and walk hands forward until body is in line from head to knees.
- Make it harder: While holding the hover, lift left leg 6 to 12 inches, pause, and lower. Do 3 to 5 times, and then switch legs.
Vasishtasana or Sage pose
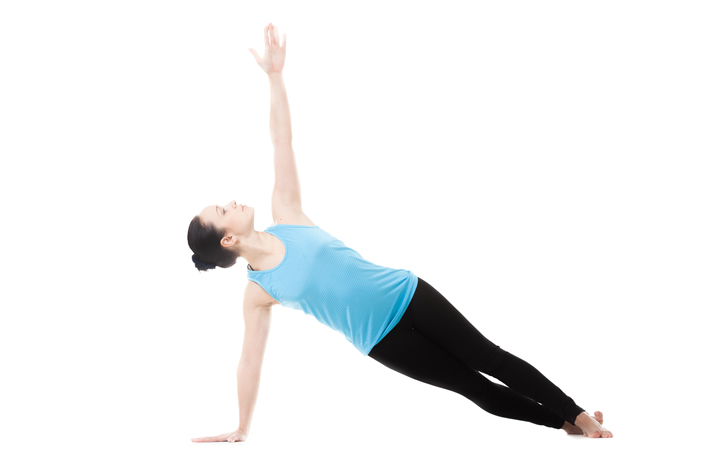
Benefits: It works extensively on the shoulder, arms and the core muscles. It also improves flexibility and sense of balance.
Steps
- Lie down on your stomach. Bend your elbows and place your palms below your shoulders
- Now tuck you toes in and push the floor to straighten your elbows such that your upper body along with your pelvis is lifted off the floor. Make sure your body is in the same alignment as it was while you were lying down
- Slowly twist your upper body to the left as you release your left hand from the floor. Simultaneously turn your right foot to its outer edge and stack your left foot on the right foot. Do not let your hips or pelvis drop. Hold it in the same alignment as it was earlier
- Look up and stay in this position for five breaths
- Repeat the pose to the other side
Setubandhasana or Bridge pose
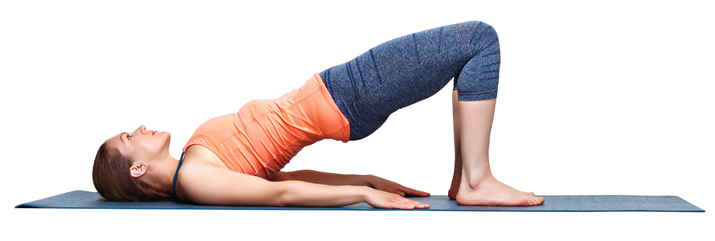
Benefits: This pose is great for toning the thighs, strengthening the shoulders and toning your abs. It also relaxes the mind, improves digestion, relieves the symptoms of menopause in women and stretches the neck and spine. It is also helps to keep one’s blood pressure under control.
Steps
- Lie flat on your yoga mat, with your feet flat on the floor.
- Now exhale and push up, and off the floor with your feet.
- Raise your body up such that your neck and head are flat on the mat and the rest of your body is in the air.
- You can use your hands to push down for added support.
- If you are flexible you can even clasp your fingers just below your raised back for that added stretch.
*Avoid doing this pose if you have a neck or back injury.
There are many reasons to incorporate yoga into your fitness routine. On a psychological level, yoga helps to decrease stress and calm the mind. Physically, it improves circulation and respiratory function, and increases flexibility and strength. Yoga can be adapted for those with limited mobility or a history of injury. Practicing yoga causes positive changes in the body, which change the mind, which changes behavior, which reinforces changes in both mind and body. Make a commitment to try yoga for a month and see if you notice any weight-loss benefits from this ancient practice.